Quality

It is becoming difficult to find quality Discus. The market is flooded with many poor quality Discus that attract buyers because of their lower cost but the Discus will discourage their owners from the first month and result in a loss of discus enthusiasts.
So, not only are quality Discus becoming scarcer but also Discus in general because of their reputation as a hard to keep fish caused by this poor quality.
Discus are like anything else, the more quality you put into them, the more beautiful they will be, but above all, the more reliable they will be and the fewer problems you will have.
But you still need to know how to recognize quality, that’s where we will help you.
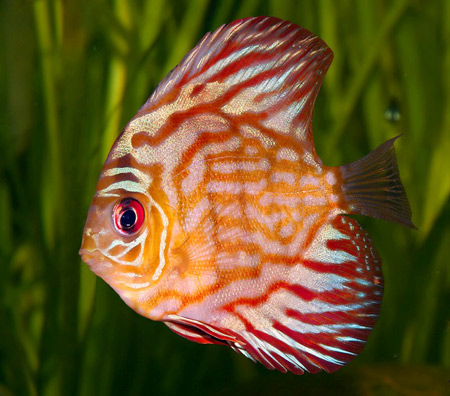
Color

First rule, do not let you ever influenced by the color of the Discus.
A Discus normally begins to take color only from 2.5″-3″. A Discus having its whole body colored or is partially brightly colored at a small size is a sign of unnatural treatment such as dyes and hormones. In general, they will have a growth problem because once they leave the farm, they can no longer grow without the food supplements they had.
In addition, breeders of this type of Discus often use antibiotics in the feed to minimize disease and loss.
This will of course affect the health and fragility of your Discus in the long run. They will also often be infertile, unable to reproduce. So even if it looks beautiful and healthy, a Discus that is colored brightly too early will most likely not develop normally. Even an adult may not keep his vivid colors.
Beware also of colors that do not look natural. For example, a yellow Discus will turn orange unless you give it a special food that does not exist in the market.

Shape

A Discus should be round and that is after about the 1st month of his birth, about 1″.
Don’t believe if you are told it will round out when it is not round at 2″ or more.
A Discus with an elongated shape, longer than it is tall, is a sign of a poor quality Discus, either genetically or through poor nutrition.
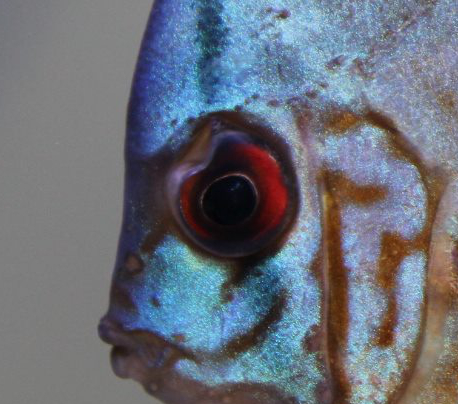
Eye

The eye should be small, proportionate to its body with a round shape without defect.
A large eye is a sign of stunted growth caused by poor nutrition or worse, internal parasites in the intestines.
This is very rarely recoverable and these Discus will never grow normally and you will take a big risk because even if it does not look sick, this kind of Discus is less resistant to different diseases.
We see more and more Discus with deformed eyes like the example in the pictures below. These eyes are not necessarily due to a disease but more to a problem in the breeding. This kind of Discus has been bred in an unnatural way. In fact in all cases, these Discus develop this malformation at the buyer’s or shortly after leaving their breeding. So even Discus without this deformity and coming from the same breeder will be low quality Discus.

Bones

Its body should not show any bones such as the top of the skull or the ribs.
This is a sign of thinness.

Behavior

The Discus is originally fearful but after more than 60 years of breeding, they have lost this fear to get used to our aquariums, provided that the breeding is done properly.
Indeed, many Discus breeding are practiced in opaque plastic tanks and these Discus do not see humans through a glass as they will do at home in your aquarium. This is the main cause that will make the Discus you will see very often shy and hidden because they see a human for the first time in front of them.
This type of fearful Discus is stressed and therefore fragile, susceptible to various diseases.
There are of course many other causes such as the layout of the aquarium or the number of Discus but look at our videos where our Discus are in tanks without decoration and that we hit the windows: click here. These videos speak for themselves to prove that our Discus are used to aquariums, with a curious character.

Disease

When buying, make sure there are no signs of disease.
There are too many diseases for us to describe them all, but as a general rule, check that its eyes are clear and translucent, that its skin is nice and smooth, and that the fins are extended.
If you see these stools, make sure they are not white.

Fins

The case of the fins is very delicate because they are fragile and damaged fins do not necessarily reflect a bad quality of Discus. They can simply have been damaged by another Discus or a change of the parameters of water.
But it can also be a problem of disease or malformation that will show a bad quality of Discus.
It is thus necessary to know how to recognize and differentiate a malformed, sick or simply damaged fin.
The best is of course to take a Discus with whole fins of a beautiful form which will take part in forming a round Discus.

Notes

Quality often equals higher price but also success.
If a Discus doesn’t seem expensive to you, ask yourself the question of its quality.
With a quality Discus, you put all the chances on your side, but don’t forget that it will remain a beautiful Discus if its maintenance is also of quality.

Examples of bad quality

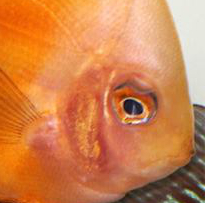
Deformed eye Deformed eye
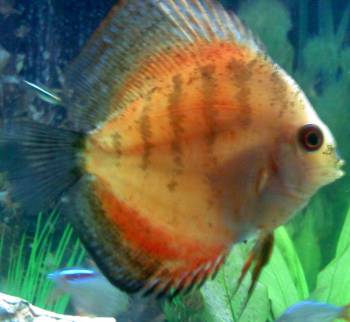
 Too colored for a 3″


Big eye, elongated shape


Big eye, skinny


Too colored for a 3″


Big eye, elongated shape


Big eye, elongated shape


Big eye, too colored for a 3″


Too colored for a 3″


Big eye, too colored for a 3″


Too colored for a 3″


Big eye, elongated shape Too colored for a 3″

 
Big eye, elongated shape


Introduction of new Discus with old ones

If you already have Discus in your aquariums where you want to introduce your new ones, here are some tips:
– Buy new Discus about the same size as the old ones, 1-2 inches maximum difference.
– Turn off or dim the aquarium light for the first few days until the new ones settle in and eat normally. You can leave the room light on during the day if you don’t have sunlight lighting the room.
– Feed them what they like. Don’t try to get them used to something else like pellets right away. They need to be strong to integrate into groups. You can get them used to another food afterwards.
– If the new ones are rejected by the old ones, move your aquarium decoration, filter rejection or other to disturb the old ones a little who can be territorial. They will then be disturbed enough not to focus on the new ones.
– Give food at each end of the aquarium to separate the group and give newcomers a better chance of eating.

Acclimating

First, do not open the transport bags of your Discus before you are told.
When receiving your Discus, take the temperature of the water in the bags. Best with an infrared thermometer. If you only have a classic thermometer, wedge it between 2 bags to sandwich it at the water level.
If the difference in temperature between that of the bags and your aquarium is more than 4° Celcius read step 1, if less than 4° skip to step 2.

Step 1 :
If the temperature difference is more than 4° Celcius, fill a bucket of water with water from your aquarium which is at 28-30°.
Soak your bags in the bucket for 20-30 minutes.
If you have a lot of bags and a box of styrofoam (or cooler), leave your bags in the box and pour in some water from your aquarium.
The goal is to raise the temperature of the water in the bags to 24-26°, so that the difference decreases to 4°.
Take the temperature of the water in the bucket or box. The temperature will drop, this is normal. It goes down while the one in the bags goes up.
The goal is to raise the temperature in the bags slowly as this could cause thermal shock if the temperature rose too quickly to 30°.
In order not to raise the temperature too quickly, do not put too much water in your bucket or box, put about the same amount of water as there is in the sum of all your bags.
After 30-45 mins the water should be 24-26°, if not, add water from your aquarium to the bucket.
This step is finished when the gap between your aquarium and that of the bucket or box is 4°.

Step 2:
If the temperature difference is 4° Celcius or less, you can soak your bags directly in your aquarium which is at 28-30°
After 20-30 mins, open the bags and pour in a small glass of water from your aquarium every 5 mins so that the starting water volume is tripled or more in 30-45 mins maximum.
Afterwards, you can release your Discus in the aquarium without the water that is in the bag that you throw away.

Reduce or turn off the aquarium lighting the first few days until your Discus eat without fear.
It’s normal if it takes 3-4 days. In the meantime, keep them calm.

Origin of wild Discus

Symphysodon discus aequifaciatus var. axelrodi (brown discus) :
Rio Tocantins
Santarèm
lago Grande
rio Tapajos
rio Urubu

Symphysodon discus aequifasciatus var. “rouge” (red discus) :
Alenquer
rio Madeira
rio Aripuana
rio Purus
rio Iça

Symphysodon discus aequifasciatus var. haraldi (blue discus) :
lago Grande
rio Urubu
rio Purus
rio Nhamunda
rio Ipixuna
lago Manacapuru
lago Amara
rio Tapaua

Symphysodon discus aequifasciatus var. “royal blue” (discus royal blue) :
rio Urubu
rio Purus
rio Trompetas
lago Manacapuru
rio Tapaua

Symphysodon discus aequifasciatus var. aequifasciatus (green discus) :
lago Coari
lago Caiambé
lago Téfé
rio Téfé
rio Jurua
rio Putumayo
rio Andira

Symphysodon discus discus (discus Heckel) :
rio Negro
rio Jau
rio Unini
rio Xeruini
rio Abacaxis
rio Trompetas

Feed

Discus fish are often used to eat food made with beef heart like the one we sell  : frozen food.

I do not recommend bloodworms as they can carry parasites. It is not for nothing that you will see on the packaging of a major brand “sterilized 3 times”.
Even with this sterilization, some parasite eggs cannot be destroyed with this sterilization method.

To get them used to eating pellets, you can give them pellets with what they like and gradually reduce what they like by increasing the amount of pellets. This can take several weeks, this is normal.
It is often enough for one Discus to eat the new food for all the others to understand that it can be eaten too.

You can also soak the dry food with beef blood or fish juice that you get from the raw meat that you buy to eat for yourself. Gradually you soak them less and less.

Feed your Discus 3 times a day with our food or quality nutritious food.
After the meal, you should see their stomachs full with a slight bump on either side of the fish.
I do not recommend more than 3 meals a day. Some will tell you 8 times a day but that’s for babies feeding on brine shrimp.
Starting from 2″, they are no longer babies and they eat much more nutritious food.
If they eat too much and too often they will spend all their time wasting their energy on digestion instead of using it for growth. They will also have general health problems like any animal that eats too much.
If you give less nutritious dry food other than our food, you can increase to 4-5 meals a day.

Quarantine

Advice for introducing new fish or mixing Discus of different strains ( origins / farms).

The mixing of strains is absolutely not doomed to failure, everything depends on the strains.
This mixing is done all the time without even knowing it, when you buy a plant or other small fish there is also a risk of mixing bacterial strains but often without consequence.
The problem is that many Discus farms practice systematic antibiotic treatments as a preventive measure throughout the breeding process and produce immune Discus and healthy carriers of ultra-resistant bacteria because they are used to antibiotics.
This phenomenon is particularly harmful with Discus that stay for months at the farm.
While the risk is less important with plants or other fish because the treatments are less and the bacteria are more common and your Discus can fight them.
First of all you should know that if you mix your Discus and some of them get sick while all of them were in good shape, it is not the fault of those who get sick but it is the fault of those who are not sick because they are healthy carriers of disease or bacteria that the others are not immune to.
So, unless a Discus needs to be isolated to eat better for example, there is no point in quarantining your sick Discus and treating them separately without treating the others.

You have to treat all your Discus, even the ones that are not sick, because in the end all of them will get sick, even the healthy carriers that do not show any signs yet.
The first ones who get sick (not immune) develop the disease quickly and the healthy carriers who are not immune to such a large amount of disease, will get sick later.
So that’s why you have to treat them all.

To check the compatibility of your fish, put your new Discus in a separate quarantine aquarium from the old ones without any contact or sharing of equipment such as a landing net for example.

After 1 month and you are assured of the health of your Discus, two possibilities:

1 – Put the Discus you prefer less of the old ones and place it with the new ones, you then risk in the worst case to lose that Discus or all the new ones.
Or place a new one with the old ones, then you risk in the worst case to lose this new one or all the old ones.
If after 2-3 weeks all is well, they are compatible, otherwise treat all your Discus, new and old, even the ones that are not sick.

2 – Make water changes of 10% of your quarantine aquarium with water from the main aquarium and the reverse, from the quarantine aquarium to the main one. Increase to 20% after one week and 50% on the third week. If one of the two aquariums gets sick, you should not only treat the sick ones, but all your Discus, even the non sick ones, which are then healthy carriers.
This last method has the advantage that the Discus can become immune and develop immune protections against the bacteria of the others by putting them in contact progressively.
But it can also be inefficient because as I said at the beginning, some bacteria are ultra-resistant.

Aquarium relocation

When moving your aquarium, you will need to be sure to keep your fish alive, but also the nitrifying bacteria in your filter.

– Place your filter media in a container with just enough water to keep it moist but NOT submerged in water.
Do not close the container otherwise make holes in the lid to allow oxygen for the bacteria.
– Collect at least 1/4-1/3 of the water in your aquarium in buckets. You can find buckets at Rona, Canadian Tire or Home Depot.
– Place the fish in transport bags or buckets. Without oxygen, they will only be able to stay there for 2-3 hours, and less if the concentration of fish is high. There is a battery operated air pump that you can use to bubble the water and oxygenate it. You will be able to keep them with this pump in a bucket much longer. Be sure to always cover your bucket as fish will jump out of a bucket very easily.
Also keep an eye on the water temperature. For Discus keep them above 24 degrees Celsius if possible, never below 21.
– Empty the remaining water from the aquarium and proceed with the move.

Arrangement:
– Fill the aquarium with the water you kept in the buckets.
– Fill your aquarium with no more than twice as much water as possible and make up the difference the following week.
– Install your filter.
– If your fish have been in the buckets for more than 2 hours, it is advisable to acclimate them in the same way as when you bought them, as the Ph in their water is probably different from that in the aquarium.

If the move is done quickly enough, there will be no problems, like a big water change.

Black spots

Black spots in varieties without vertical bars

Discus without vertical bars often based on Pigeon Blood such as Pigeon Blood Blue, Red, Silver, Snake, Marlboro, … have small black spots called charcoal or pepper.
It is the equivalent of the vertical bars that are scattered all over the body.
This is permanent like the vertical bars but emerges more or less depending on :

– emotion, stress, excitement.
– domination. Dominated Discus tend to show more bars and pepper.
– the color of the habitat, the environment. With a sand or a dark background, the charcoal comes out more. The Discus is a bit like the chameleon.
– the quality of the water or the light. If the Discus is not completely comfortable, these black spots will come out.
– age. Often this decreases with age.
– depending on the quality of the Discus.

Example of small black spots due to a dark environment :

Here are the same Discus, 1 year later in a clearer environment:[:fr]

Ultra Violet (UV) Sterilizer

The UV sterilizer is a device with an Ultra Violet bulb that destroys pathogens: bacteria, viruses, parasites, algae, …
This system allows you to offer your fish a water in which they live of better quality.

A fish’s immune system is either innate, genetically programmed from birth, or adaptive, i.e. it develops according to the pathogens it encounters.
A UV sterilizer will not make fish more fragile because they are born with an immune system. However, it is true that it will prevent the development of the adaptive immune system.
But do we want to risk making our fish sick by putting them in the presence of pathogens so that they develop their adaptive immune system?… NO.

The majority of breeders and professional importers have systems equipped with UV sterilizers.
This brings us to 2 important points:

  • Fish raised with UV sterilizers may not have a developed immune system to resist problems that may be present in tap water, brought in by other fish or plants. These fish are more likely to get sick if you do not have a UV sterilizer.
  • If you mix fish from different breeders raised without a UV sterilizer, each fish will have a different immune system and may carry pathogens that it is immune to. Once together, one fish may make the other sick by releasing pathogens into the water that the other fish may not be immune to. A UV sterilizer reduces the risk of contamination by reducing the number of pathogens in the water. It allows the fish to experience a low level of pathogen attack and thus develop an adaptive immune system. If fish are exposed to a high concentration of pathogens without a UV sterilizer, they become ill more easily.

The UV sterilizer is not mandatory but highly recommended.
Moreover, with large fish such as Discus, pollution and waste quickly accumulate in the aquarium favoring the development and multiplication of microbes. All the more reason to have a UV sterilizer.
With a UV sterilizer, the fish live in purer water but not completely sterile, so disease problems are still possible.
It does not replace a good maintenance of your aquarium.

Getting started

In order to start well with Discus, there are some fairly simple rules to apply.

Common situations :

 IdealBasicTemporaryRiskyImpossible
Aquarium in gallons (liters)120 (450)70(250)55 (200)– de 55 (200)– de 40 (150)
Discus Quantity1088 up to 10cm (4″)less than 8 less than 6
FiltrationExternalExternalExternalInternal filter or waterfall hang on backInternal filter or waterfall hang on back
Air pump with bubblerYesYesYesYesYes
Ultraviolet SterilizerYesYesYesYesYes
Gravel and plantedYesYesYesYesYes
Other small community fishYesYesYesYesYes
Weekly water change20-30%20-30%20-30%20-30%20-30%
Ask for advice on FacebookNoNoNoNoYes
      

Ideal :
The aquarium and the equipment will keep your Discus in very good conditions all their life.

Basic:
The aquarium and equipment will keep your Discus in good condition, but you may encounter some problems.

Temporary :
The aquarium and equipment will allow you to keep your small Discus in anticipation of a larger aquarium after a few months when they grow beyond 3-4 inches.

Risky :
The aquarium and equipment will keep your Discus at risk of problems.

Impossible :
Do not buy Discus.

Facebook and other social media are the worst places to go for information and advice. Instead, look for information in books, trusted websites or on our webpage : http://www.discusparadise.com/documentations/ce-quil-faut-savoir-sur-le-discus/